🎯 Introduction
Electronic presentations are powerful tools for sharing ideas, opinions, and knowledge with audiences. This chapter covers creating professional multimedia presentations using presentation software like Microsoft PowerPoint and LibreOffice Impress.
- Understanding what presentations are
- Characteristics of quality presentations
- Creating multimedia presentations
- Working with slides, animations, and transitions
- Inserting images, videos, and audio
📽️ 8.1 What is a Presentation?
A presentation is a method of sharing views, opinions, ideas, and knowledge with a larger group using various techniques, methods, gestures, and tools.
Evolution of Presentation Tools
Traditional Tools:
| Tool | Features | Limitations |
|---|---|---|
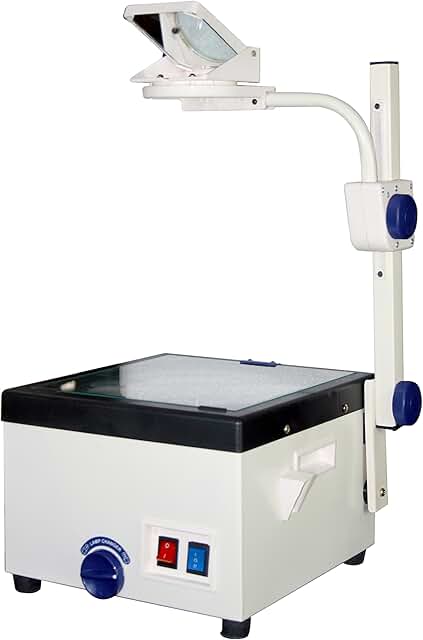
| Overhead Projector (OHP) |
• Uses transparent sheets • Can write during presentation • Simple to use |
• Cannot erase and reuse sheets • No audio/video support • Pre-preparation needed |
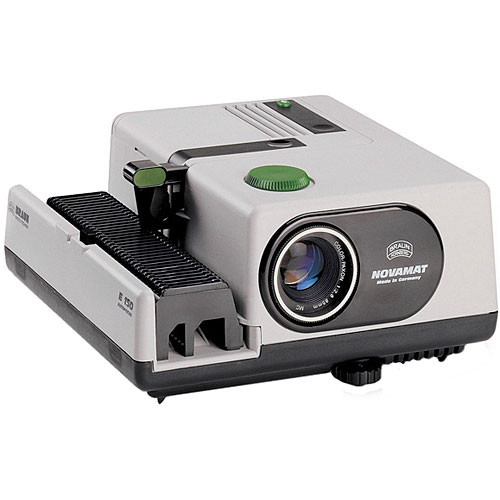
| Slide Projector |
• Uses photographic slides • High image quality • Professional look |
• Complex slide preparation • Lab processing required • No audio/video support |
Modern Tools - Multimedia Projector
- Quick presentation creation using computers
- Support for multimedia content (audio, video, images)
- Easy editing and updates
- Interactive features
- Portable and efficient

Multimedia Content Types:
- Text (numbers and letters)
- Pictures and graphics
- Images and photographs
- Movies and videos
- Tables and graphs
- Voice and sound
⭐ 8.2 Characteristics of Quality Presentations
1. Number of Lines
More lines make reading difficult and may require smaller fonts.
2. Font Size
Consider the distance between screen and audience.
3. Grammar and Language
- Spelling accuracy
- Grammar correctness
- Language appropriateness
4. Images, Drawings, Tables, and Graphs
Too many visual elements can confuse the audience.
5. Use of Colors
- Use dark colors and bold text for emphasis
- Avoid using dark red throughout (uncomfortable for eyes)
- Use red sparingly for important points
- Pay attention to background-foreground contrast
6. Animations and Videos
Multiple animations can cause sound overlap and confusion.
7. Target Audience
- Meet audience objectives
- Avoid distracting elements
- Keep focus on main message
- Age-appropriate content
💻 8.3 Presentation Software
Software that helps create presentations with multimedia content.
Popular Presentation Software
Microsoft PowerPoint
ProprietaryMicrosoft Corporation
LibreOffice Impress
Open SourceDocument Foundation
OpenOffice Impress
Open SourceApache Corporation
Apple Keynote
ProprietaryApple Inc.
Corel Presentation
ProprietaryCorel Corporation
Google Slides
Web-based- MS Office 365 PowerPoint
- Google Presentations
- Microsoft SkyDrive PowerPoint
These allow cloud storage and access without local installation.
🎨 8.4 Microsoft PowerPoint Interface
Starting PowerPoint

Interface Components
1. Quick Access Toolbar
Located on the left side of the title bar. Provides quick access to frequently used commands. Customizable based on user needs.
2. Title Bar
Displays presentation name and software name. Contains Minimize, Maximize/Restore, and Close buttons.
3. Tabs and Ribbon
The toolbar is organized into tabs (Home, Insert, Design, etc.). Each tab contains groups of related tools represented by icons.

4. Slide Pane
Vertical pane on the left showing slide thumbnails. Click any slide to edit it in the main workspace.
5. Workspace
Main area where presentations are created and edited.
6. Task Pane
Useful for adding features like animations to the presentation.
7. Notes Pane
Add speaker notes (not visible to audience during presentation).
8. Status Bar
Shows slide number, total slides, and selected language.
9. View Options
- Normal View: Default editing view
- Slide Sorter View: See all slides as thumbnails, reorder easily
- Reading View: Preview slides clearly
- Slide Show: Full-screen presentation mode (F5 key)

10. Zoom Control
Zoom in or out of slides for better viewing.
📝 8.5 LibreOffice Impress Interface
Starting LibreOffice Impress

Interface Components
Tasks Pane Components
- Master Pages: Choose presentation styles and themes
- Layouts: Select from saved slide layouts
- Table Design: Styling options for tables
- Custom Animation: Add, change, or remove animations
- Slide Transition: Control slide transition effects, speed, and sound

Drawing Toolbar
Provides tools for creating shapes, lines, and drawings on slides.
🛠️ 8.6 Working with Presentations
Setting Slide Size
Choosing Themes and Layouts
Microsoft PowerPoint:
- Home → New Slide or Layout → Office Theme
- Select from available templates
- Use "Reuse Slides" to apply themes from existing presentations

LibreOffice Impress:
- Format → Slide Layout → Layout
- Format → Slide Layout → Master Pages (for pre-designed themes)

Adding Title Slide
Select Title Slide layout and add your presentation title and subtitle.

Saving Presentations
Opening Existing Presentations
Slide Backgrounds
PowerPoint:
- Design → Background Styles
- Background → Format Background (for colors, shapes, images)

Impress:
- Format → Page → Background
- Add colors, gradients, or images
Adding Text to Slides
Using Placeholders:
Click on areas marked "CLICK TO ADD TITLE" or "CLICK TO ADD TEXT" and start typing.
Adding Text Without Placeholders:
Inserting Objects
Shapes/Objects:

Changing Shape Colors:
- PowerPoint: Right-click shape → Format Shape
- Impress: View → Tool Bars → Line and Filling
Inserting Clip Art/Gallery:
Inserting Pictures:
Slide Transitions
Control how slides change from one to another.
PowerPoint:
- Transitions Tab → Select transition style
- Effect Options → Choose direction
- Sound → Add sound effects
- Apply to All → Apply same transition to all slides
Impress:
- Format → Slide Layout → Slide Transition
- Apply to Selected Slide → Choose transition
- Modify Transition → Speed, Sound, Advance options
- Apply to All Slides → Make uniform transitions
Adding Animations
Apply animations to text, shapes, images, and other objects.
PowerPoint:

Impress:

Inserting Audio
PowerPoint:
- Insert → Media → Audio
- Audio from File → Browse and select audio file
- Clip Art Audio → Use built-in sounds
- Record Audio → Record using microphone
Impress:
- Insert → Movie and Sound
- Select audio file
- Apply animation to audio clip
- Can also insert recorded audio
Inserting Video
PowerPoint:
- Insert → Media → Video
- Video from File → Select local video
- Video from Web Site → Embed online video
- Clip Art Video → Use built-in videos
Impress:
- Insert → Movie and Sound
- Browse and select video file
- Resize video as needed
- Apply animations to video
Printing Presentations
File → Print
PowerPoint Print Options:
- Printer → Select connected printer
- Settings → Choose slides to print (All, Current, Custom)
- Print Layout → Slides, Handouts, Notes, Outline
- Color options → Color, Grayscale, Black & White

Impress Print Options:
- General → Printer → Select printer
- Range and copies → All slides or specific range
- Number of copies → Specify quantity
- Print → Document options (Slides, Handouts, Notes, Outline)

Handout Printing:
- Provide printed copies to audience
- Allow note-taking beside slides
- Useful reference material
- Multiple slides per page (2, 3, 4, 6, or 9)

💡 10 Practical Examples
Example 1: School History Presentation
Scenario: Create a presentation showcasing your school's history for ICT Day.
Steps:
- Choose professional theme (Design → Themes)
- Title slide with school name and emblem
- Timeline slides showing key milestones
- Insert historical photos (Insert → Picture)
- Add subtle animations to emblem (Animation → Entrance)
- Use consistent color scheme matching school colors
- Include video clips of school events
- Add slide transitions (Fade or Push)
Example 2: Science Project on Solar System
Scenario: Present your science project on planets.
Steps:
- Dark background theme for space effect
- Insert planet images with captions
- Create orbit animation using Motion Paths
- Add comparative table for planet sizes
- Include audio narration for each planet
- Use bold, white text for visibility (32pt minimum)
- Maximum 7 lines per slide
- Add video clip of space exploration
Example 3: Business Product Launch
Scenario: Launch presentation for new product.
Steps:
- Modern, professional template
- Company logo on every slide (Insert → Header & Footer)
- Product images with zoom animation
- Bar charts showing market research
- Video testimonials from beta testers
- Pricing table with emphasis on key features
- Call-to-action slide with contact information
- Automatic slide timing (5 seconds per slide)
Example 4: Environmental Awareness Campaign
Scenario: Presentation on climate change for community.
Steps:
- Green-themed color scheme
- Striking images of environmental issues
- Graphs showing climate data trends
- Animated infographics about recycling
- Video clips of affected wildlife
- Action steps with checkmark bullets
- Sound effects for emphasis (sparingly)
- QR code slide linking to resources
Example 5: Math Concepts Tutorial
Scenario: Explain Pythagorean theorem to classmates.
Steps:
- Clean, minimal design for focus
- Insert geometric shapes (Insert → Shapes)
- Step-by-step animations revealing formula
- Color-coded triangles (red, blue, green)
- Practice problems on separate slides
- Answers appear with click animation
- Use large fonts (40pt for formulas)
- Summary slide with key takeaways
Example 6: Book Review Presentation
Scenario: Present a book review for literature class.
Steps:
- Theme matching book's genre/mood
- Book cover image on title slide
- Author biography with photo
- Plot summary using bullet points (6-8 lines)
- Character profiles with images
- Favorite quotes with emphasis animation
- Rating system with star graphics
- Background music related to book theme
Example 7: Sports Event Highlights
Scenario: Showcase school sports day achievements.
Steps:
- Energetic, bold color scheme
- Action photos from events
- Video highlights of key moments
- Results table with winner names
- Animated medal icons (gold, silver, bronze)
- Slideshow of participant photos
- Upbeat background music
- Thank you slide for organizers
Example 8: Cultural Heritage Presentation
Scenario: Present Sri Lankan cultural traditions.
Steps:
- Traditional color palette (saffron, red, gold)
- Photos of cultural festivals
- Map showing cultural regions
- Traditional music clips
- Video of traditional dances
- Costume images with descriptions
- Food gallery slide
- Fade transitions for smooth flow
Example 9: Career Day Presentation
Scenario: Present career options in IT field.
Steps:
- Professional business template
- Career path flowchart
- Photos of professionals at work
- Salary comparison charts
- Required skills checklist
- Educational pathway timeline
- Video interviews with IT professionals
- Interactive Q&A slide
Example 10: Health & Fitness Guide
Scenario: Presentation on healthy lifestyle for students.
Steps:
- Fresh, vibrant color scheme (greens, blues)
- Food pyramid diagram
- Exercise demonstration videos
- Weekly meal plan table
- Before/after comparison images
- Benefits list with animated checkmarks
- Sleep schedule infographic
- Motivational quotes with emphasis
🎯 10 Learning Activities
Activity 1: Compare Presentation Tools
Task: Create a comparison table listing differences between traditional (OHP, Slide Projector) and electronic presentations. Include pros and cons of each. Write how you can use electronic presentations in your studies.
Expected Output: A detailed comparison document with at least 5 points for each category.
Activity 2: Multimedia Content List
Task: Make a comprehensive list of all possible multimedia content types that can be included in electronic presentations. Categorize them as: Text, Visual, Audio, Video, Interactive.
Expected Output: Categorized list with examples for each type.
Activity 3: Quality Presentation Checklist
Task: Create a checklist of all important points needed for an effective presentation. Design this as a one-page reference guide that you can use before creating any presentation.
Expected Output: Professional checklist with all 7 quality characteristics.
Activity 4: Presentation Software Research
Task: Search online and find features of presentation software not covered in class (e.g., MS Office 365 PowerPoint, Google Slides, Prezi). Create a feature comparison table.
Expected Output: Table comparing at least 4 different software with 8-10 features each.
Activity 5: My First Presentation
Task: Create a presentation titled "MyFirstPresentation" with:
- At least 5 slides
- Different slide layouts
- Appropriate theme
- Save it properly
Expected Output: Saved presentation file demonstrating basic skills.
Activity 6: Adding Multimedia Elements
Task: Open your "MyFirstPresentation" and add:
- 2 shapes with different colors
- 1 clip art image
- 1 photograph from your device
- 1 video clip
- 1 audio clip
Expected Output: Enhanced presentation with all multimedia elements properly inserted.
Activity 7: Animation Master
Task: Open "MyFirstPresentation" and apply:
- Slide transitions to all slides (different for each)
- Custom animations to inserted objects
- At least 3 different animation types (Entrance, Emphasis, Exit)
- Set timing for automatic transitions
Expected Output: Fully animated presentation demonstrating advanced skills.
Activity 8: Educational Presentation
Task: Choose a difficult lesson from any subject and create a multimedia presentation to help classmates understand it easily. Include pictures, charts, animations, sound clips, videos, different backgrounds, and slide transitions.
Expected Output: Complete educational presentation (8-10 slides) meeting all quality standards.
Activity 9: Green Computing Presentation
Task: Research Green Computing and create a presentation including:
- Animated title slide
- Definition and importance
- Images showing green practices
- Video clip about e-waste
- Audio narration
- Navigation buttons
- Conclusion slide
Expected Output: Professional presentation on environmental topic (10-12 slides).
Activity 10: Presentation Portfolio
Task: Create a personal portfolio presentation showcasing:
- Your academic achievements
- Extracurricular activities
- Skills and hobbies
- Future goals
- Photo gallery
- Contact information
Expected Output: Professional portfolio presentation with printed handouts.
❓ 20 Questions & Answers
- Can display presentations created quickly on computers
- Ability to include multimedia content (audio, video, animations)
- Easy to edit and update content without recreating slides
- LibreOffice Impress - Document Foundation
- OpenOffice.org Impress - Apache Corporation
- Google Slides - Google (web-based)
Workspace: The main central area where you create, edit, and design individual slides. This is where the actual content creation happens.
- Normal View: Default editing view for creating presentations
- Slide Sorter View: Shows all slides as thumbnails for easy reordering
- Reading View: Preview slides clearly before presenting
- Slide Show: Full-screen presentation mode (F5 key)
- Master Pages: Choose presentation styles and themes
- Layouts: Select from saved slide layouts
- Table Design: Styling options for tables
- Custom Animation: Add, change, or remove animations
- Slide Transition: Control slide transition effects
- Go to Insert tab
- Click Shapes in the Illustrations group
- Select desired shape from dropdown menu
- Click and drag on the slide to create the shape
- Resize using corner handles as needed
Animation: Effects applied to individual objects within a slide (text, images, shapes) to control how they appear, emphasize, or exit (e.g., Fly In, Bounce, Fade).
- Go to Insert menu
- Select Movie and Sound
- Browse and select the video file from dialog box
- Click to place video on slide
- Resize video to required size
- Optionally apply animations to the video
- Use dark colors and bold text for emphasis
- Avoid using intense colors (like dark red) throughout as they strain eyes
- Use red sparingly for important points only
- Ensure good contrast between background and foreground colors
- Be consistent with color scheme throughout presentation
- Consider accessibility for color-blind viewers
- Audio from File: Insert an existing audio file from computer or external storage
- Clip Art Audio: Use built-in sound effects from the software library
- Record Audio: Record audio directly using a microphone and save to presentation
- Click File menu
- Select Save As
- Choose folder location (e.g., My Documents)
- Enter file name in the text box
- Click Save button
Benefits:
- Provide reference material for audience
- Allow note-taking beside slides during presentation
- Help audience remember key points
- Useful for absent participants
- Save paper by printing multiple slides per page
Importance in presentations:
- Print only necessary handouts to save paper
- Use digital distribution instead of printing
- Optimize file sizes to reduce energy consumption
- Turn off projectors when not in use
- Share presentations electronically
- Recycle or reuse old presentation materials
- Entrance: Controls how objects appear on the slide (e.g., Fly In, Fade In, Zoom)
- Emphasis: Draws attention to objects already on slide (e.g., Pulse, Grow, Color Change)
- Exit: Controls how objects leave the slide (e.g., Fly Out, Fade Out, Disappear)
- Motion Paths: Makes objects move along specific paths on the slide (e.g., lines, curves, custom paths)
📋 Chapter Summary
Key Takeaways:
- Electronic presentations are modern tools for sharing information using multimedia content
- Quality presentations follow guidelines: 6-9 lines, 32pt+ font, max 2 images per slide
- Popular software includes PowerPoint (proprietary) and Impress (open source)
- Understanding interface components helps efficient presentation creation
- Multimedia elements (text, images, audio, video) enhance engagement
- Proper use of animations and transitions improves presentation flow
- Consider target audience and maintain focus on objectives
- Handouts provide valuable reference material for audiences
- Green computing practices should be applied to presentation creation
- Practice and creativity lead to professional presentations
🎓 Study Tips:
- Practice creating presentations regularly to master the software
- Watch presentations critically to learn effective techniques
- Always check spelling and grammar before presenting
- Test your presentation on actual equipment before important events
- Keep backup copies of presentations in multiple locations
- Ask for feedback to improve your presentation skills
- Explore advanced features as you gain confidence